Inside Salesforce Revenue Cloud: The Billing Process — Unpacked
This article breaks down how a billing configuration flows from setup to execution in Salesforce Revenue Cloud, covering Billing Policies, Treatments, and Treatment Items, all the way to Billing Schedule generation upon order activation.

Step 1: Define Billing Components
The process begins with a billing administrator defining the core components that govern how products are invoiced.
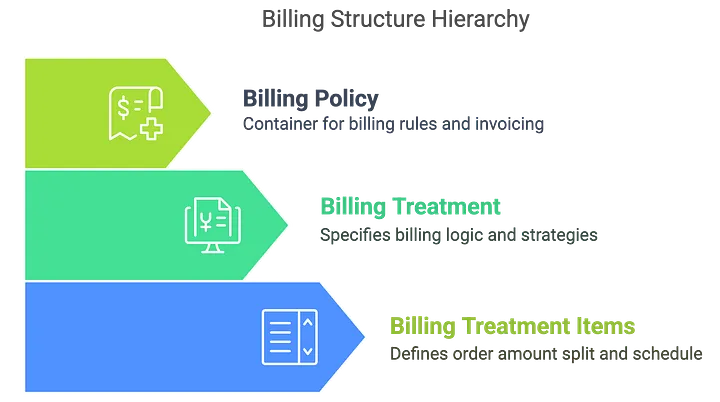
Billing Policy
A Billing Policy acts as a container for billing rules and can host multiple Billing Treatments. It defines the high-level approach to invoicing a customer for a product.
Billing Treatment
This component specifies the detailed billing logic, such as the schedule, type, and strategy. You can create multiple treatments for different business models (e.g., Milestone, Monthly, Usage-based).
Billing Treatment Items
These define exactly how the order amount is split and scheduled.
- Percentage: A percentage of the order value (e.g., 30% upfront).
- Flat Amount: A fixed amount for billing (e.g., $500).
- Remainder: Captures the remaining amount after other percentages or flat amounts have been applied.
Step 2: Assign Billing Policy to a Product
Once the components are defined, the Billing Policy is linked directly to a product record.
- Navigate to the Product record.
- Set the
BillingPolicyIdfield to the desired Billing Policy.
This simple step connects the product to its predefined billing configuration.
Step 3: Create an Order
When a sales user converts a Quote to an Order, the products on the quote become Order Line Items (OrderProducts). Each Order Line Item automatically inherits the Billing Policy from its parent product.
Step 4: Assign the Billing Treatment
The system then determines which specific Billing Treatment to apply based on the 'Billing Treatment Selection' field on the Billing Policy.

1. Default
The system automatically applies the default Billing Treatment defined in the Billing Policy.
2. Manual
A sales user can manually override the default by selecting a specific Billing Treatment on the OrderProduct.BillingTreatmentId field. If one isn't chosen manually, the system falls back to the policy's default, and then the org-level default.
3. Legal Entity
The system selects the Billing Treatment that matches the Legal Entity of the order. If no match is found, it follows a fallback logic: policy default, then org-level default. If no treatment is found, the billing calculation will fail.
The outcome of all three paths is a valid Billing Treatment assigned to the Order Line Item.
Step 5: Activate the Order & Generate the Billing Schedule
Upon Order Activation, a Salesforce flow triggers the Order-to-Billing Schedule process. The system reads the Billing Treatment Items assigned to the Order Line Item and creates two key records:
- Billing Schedule Group
- Billing Schedule
These output objects are then used to drive automated invoice generation and revenue recognition downstream.

The end result is a fully automated, compliant, and flexible billing process where custom logic can be applied per product or transaction, all driven by a central, scalable configuration.